If you've been using your mechanical keyboard for more than a month without cleaning it, there's a small ecosystem thriving between your keycaps. Crumbs, dead skin, hair, dust from Indian roads, and that mysterious sticky residue — it all accumulates faster than you'd think.
The good news? Cleaning a mechanical keyboard is straightforward, oddly satisfying, and takes less time than you'd expect. Whether you have a budget Redgear or a premium Keychron, this guide covers everything from a quick weekly wipe to a full deep clean with lube and reassembly.
Why Clean Your Mechanical Keyboard?
Beyond the obvious hygiene factor, there are real performance reasons to keep your keyboard clean:
Sticky or Unresponsive Keys
Debris under keycaps interferes with switch actuation. Sugary drink spills are the #1 killer of smooth keypresses.
Scratchy Switch Feel
Dust particles enter the switch housing over time, making linear switches feel gritty and tactile bumps inconsistent.
Stabilizer Rattle Gets Worse
Lube on stabilizers dries out and collects grime, turning a smooth spacebar into a rattly mess over months.
Bacteria & Allergens
Studies show keyboards can harbor more bacteria than a toilet seat. In India's warm climate, bacterial growth is even faster.
Longevity & Resale Value
A well-maintained mechanical keyboard lasts 5-10 years. If you ever sell on r/mkindia or Mechkeys Discord, clean boards fetch significantly better prices.
In Indian conditions specifically — high dust levels, monsoon humidity, and hot summers that make palms sweaty — your keyboard gets dirtier faster than someone gaming in a climate-controlled room in Europe. Monthly deep cleans aren't overkill here; they're necessary.
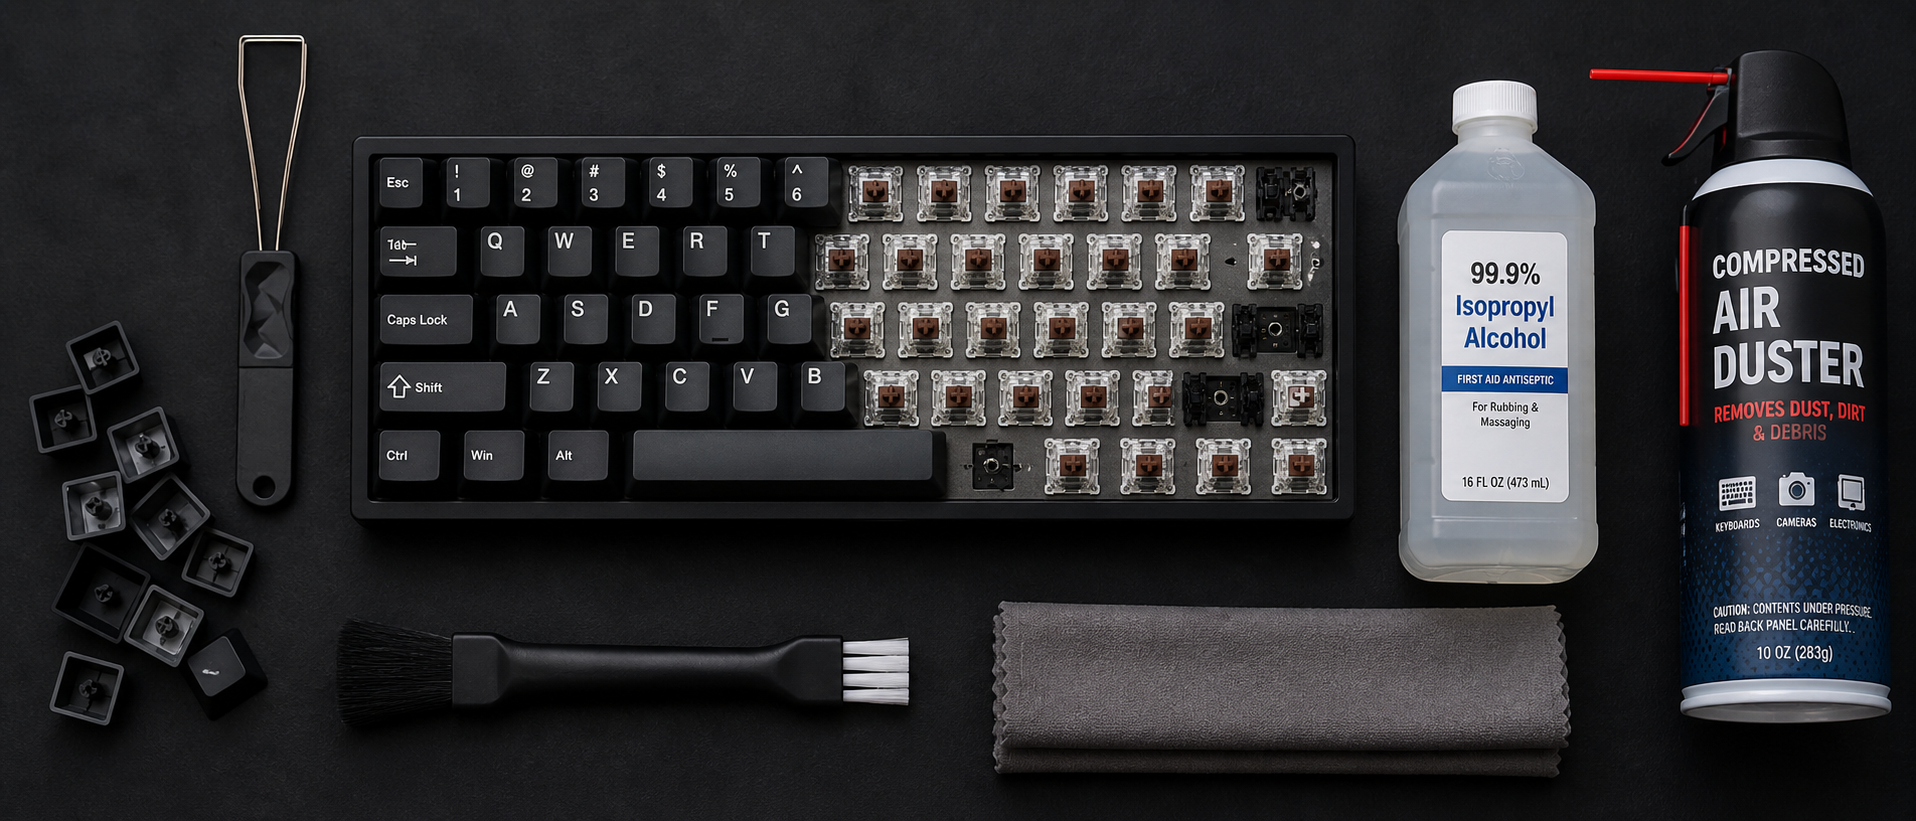
What You Need (Tools & Supplies)
Before you start, gather everything. Nothing worse than having your keyboard half-disassembled and realizing you don't have IPA. Here's the full kit:
| Item | Purpose | Approx. Price (INR) |
|---|---|---|
| Keycap puller (wire type) | Safely removes keycaps without damage | Rs 100–200 |
| Switch puller (for hot-swap boards) | Removes switches without bending pins | Rs 100–150 |
| Compressed air can / electric air blower | Blasts debris from between switches | Rs 300–800 |
| Isopropyl Alcohol (IPA) 90%+ | Dissolves grime, evaporates clean | Rs 200–400 (500ml) |
| Soft-bristle brush / old toothbrush | Scrubs between switches and plate | Rs 20–50 |
| Microfiber cloths (2-3) | Lint-free wiping for case and plate | Rs 100–200 (pack) |
| Bowl + warm water + mild soap | Soaking keycaps | Already at home |
| Cotton swabs (Q-tips) | Cleaning tight spots and stabilizer housings | Rs 50–100 |
| Krytox 205g0 or Permatex dielectric grease | Re-lubing stabilizers after cleaning | Rs 300–600 (small tub) |
| Tweezers | Picking out stubborn debris and hair | Rs 50–100 |
Where to Buy in India
Amazon India has keycap pullers, switch pullers, and IPA readily available — search for "keyboard cleaning kit" for bundles around Rs 300-500. For Krytox 205g0 lube, check Rectangles.store, StacksKB, or Meckeys.com — India's dedicated mechanical keyboard stores. For compressed air alternatives, an electric air blower (Rs 400-700 on Amazon) is more economical long-term than disposable cans, which are expensive and hard to find in India.
Quick Clean (5 Minutes)
Don't have time for a full teardown? This quick routine keeps things under control between deep cleans. Do this once a week — it takes less time than a Valorant queue.
Unplug Your Keyboard
Always disconnect before cleaning. For wireless boards, turn off the switch.
Flip and Shake
Turn the keyboard upside down at a slight angle and gently shake. You'll be disgusted by what falls out — crumbs, hair, and mysterious debris.
Blast with Compressed Air
Hold the can at an angle (never fully inverted) and blow between the keys in short bursts. Work from one side to the other systematically.
Wipe Keycap Surfaces
Dampen a microfiber cloth with a tiny bit of IPA or water. Wipe the top surface of each keycap. This removes finger oil and grime buildup.
Brush Between Keys
Use a soft brush to sweep between the keycaps where compressed air might have missed. A clean makeup brush works surprisingly well.
That's it. Five minutes, no disassembly required. This alone prevents 80% of the grime buildup that leads to sticky keys and scratchy switches.
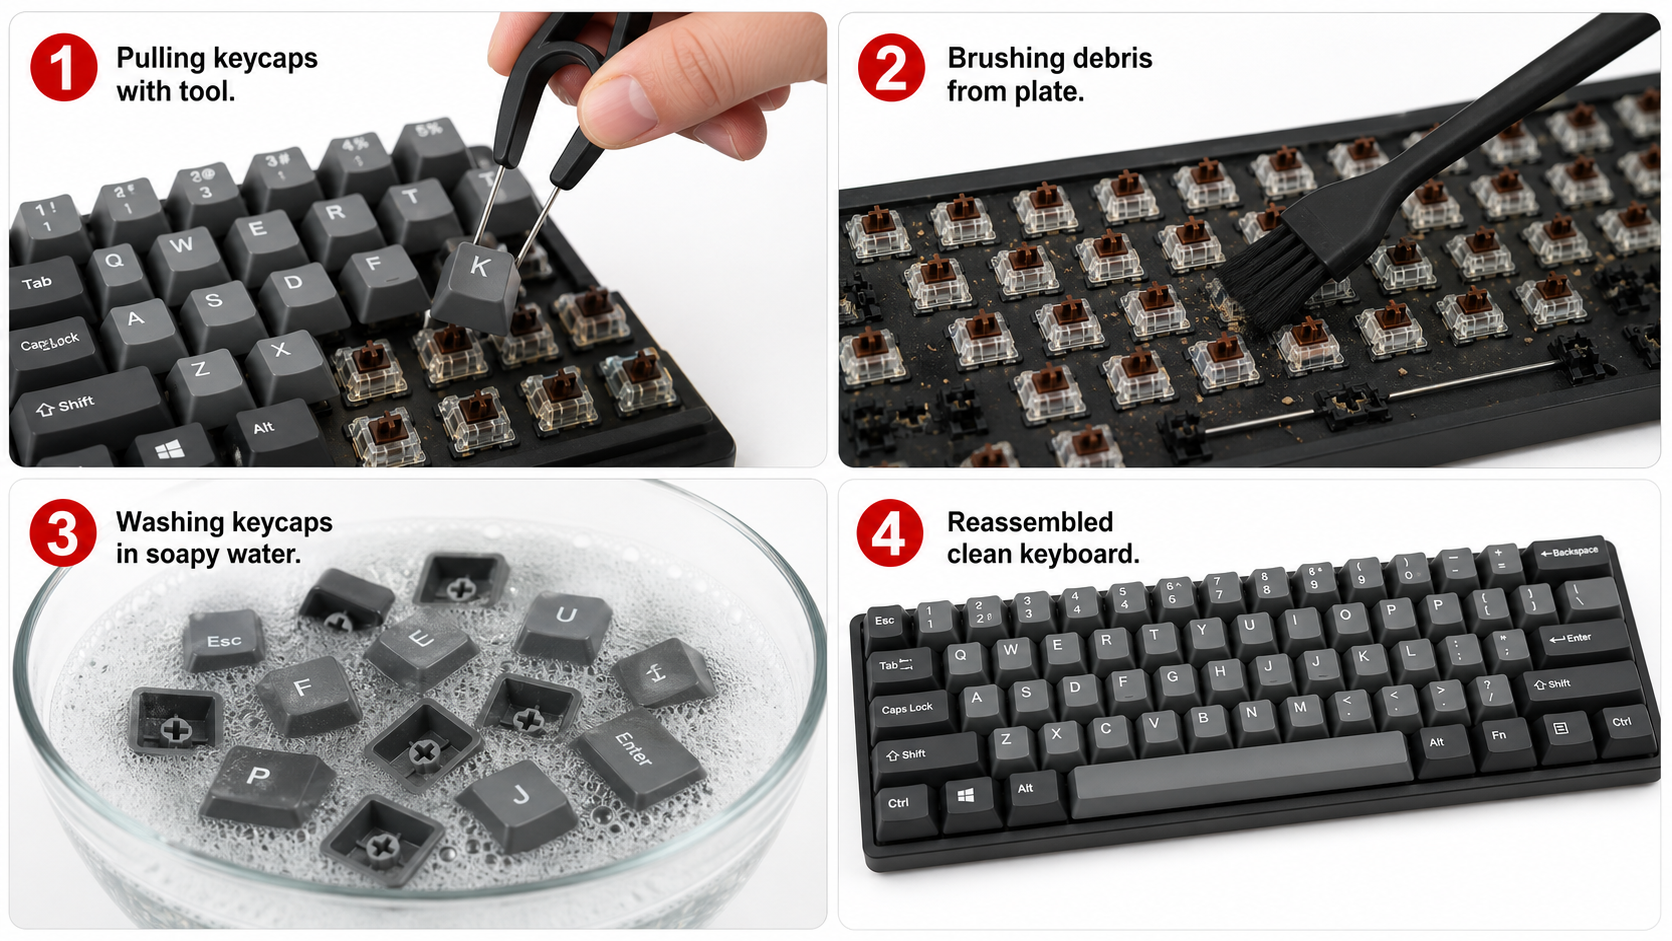
Deep Clean (Step by Step)
This is the full treatment. Set aside 45-60 minutes (plus drying time). Do this every 2-3 months — or monthly if you game in a dusty room, eat at your desk, or have pets.
Photograph Your Layout
Take a photo of your keyboard before removing keycaps. This is your reference for reassembly, especially if you have a non-standard layout or custom keycap set.
Unplug and Remove Keycaps
Use a wire keycap puller (never a flat tool that can scratch). Place the puller around the keycap, squeeze, and pull straight up. Start with the smaller keys — leave spacebar and larger stabilized keys for last. Place keycaps in a bowl.
Remove Stabilized Keys Carefully
For spacebar, shift, enter, and backspace — pull the keycap up gently and unhook the stabilizer wire from the keycap inserts. Don't yank. If it feels stuck, wiggle very slightly while pulling up.
For Hot-Swap Boards: Remove Switches (Optional)
If your board is hot-swappable (Keychron, Royal Kludge, Gamakay, etc.), use a switch puller to remove switches for deeper access to the plate. Press the two clips on the switch simultaneously and pull straight up. Not applicable for soldered boards.
Blast the Bare Board
With keycaps removed, use compressed air to blow out all the debris you can now see. You'll find hair, crumbs, dust bunnies, and probably a few things you can't identify. Work methodically from top to bottom.
Brush and Wipe the Plate
Use a soft brush to loosen stubborn debris around switch housings. Follow with a cotton swab dipped in IPA for sticky spots. Wipe the plate with an IPA-dampened microfiber cloth.
Clean the Case
If your keyboard case is easily removable (screws on bottom), separate it and wash with warm soapy water. Plastic and aluminum cases can handle this. Dry thoroughly before reassembly.
Reassemble Once Everything is Dry
Wait until all parts are completely dry. Reinsert switches (hot-swap), replace keycaps using your photo reference, and reattach stabilized keys last. Plug in and test every key.
Hot-Swap vs Soldered: Key Difference
Hot-swappable keyboards (Keychron V/Q series, Royal Kludge, Gamakay) let you remove switches without desoldering — making deep cleaning much easier. You get full access to the plate and can even clean individual switches. Soldered keyboards (most budget boards like Cosmic Byte, Redgear) mean you can only clean around the switches, not remove them. For soldered boards, compressed air and IPA on cotton swabs are your best friends.
How to Wash Keycaps
Keycaps are the dirtiest part of your keyboard — they absorb finger oil, collect dust, and develop a shiny, greasy patina over time (especially ABS keycaps). Here's how to get them looking new:
Fill a Bowl with Warm Water + Mild Soap
Use lukewarm water (not hot — hot water can warp ABS keycaps). Add a few drops of dish soap or a denture cleaning tablet for extra cleaning power.
Soak for 30-60 Minutes
Drop all keycaps into the soapy water. Let them soak to loosen dried grime. For very dirty keycaps, soak up to 2 hours. PBT keycaps are tougher — they can handle longer soaks.
Scrub Stubborn Grime
Use an old toothbrush to scrub keycaps that still have buildup — especially the spacebar, WASD cluster, and any keys with visible shine. Focus on the sides and stem area.
Rinse with Clean Water
Rinse all keycaps under running water to remove soap residue. Any leftover soap will leave a film and attract more dust.
Dry Completely (This is Critical)
Spread keycaps on a clean towel, stem-side up. Let them air dry for at least 4-6 hours — overnight is safest. In humid Indian monsoon weather, use a fan pointed at them or place near an AC vent. Never reassemble with damp keycaps.
Pro tip for Indian users: During monsoon season (June-September), keycaps take longer to dry due to 80%+ humidity. Consider using a hair dryer on the cool setting to speed things up, or place them in an air-conditioned room. Never use the hot setting — it warps ABS plastic.
Cleaning the Switches & Plate
With keycaps removed, you have access to the switch tops and plate. Here's how to clean them properly:
The Plate
Use a microfiber cloth dampened with IPA to wipe the entire plate surface. For stuck-on grime between switch cutouts, use a cotton swab soaked in IPA. A soft brush helps dislodge debris in hard-to-reach spots between switches.
Switch Tops (Soldered Boards)
Wipe switch tops with an IPA-dampened cloth. Use a cotton swab around the stem opening. Do NOT pour liquid into the switch — a tiny drop of IPA on a swab is enough. Let it evaporate fully before plugging in.
Switch Internals (Hot-Swap Boards Only)
If you've removed switches, you can open them with a switch opener (Rs 200 on Amazon India). Wipe the stem, spring, and housing interior with IPA. This is also the perfect time to re-lube switches if they feel scratchy. Use Krytox 205g0 on the stem rails and spring.
The PCB
If you can access the PCB (after removing plate-mount switches), use compressed air only. Never use water on PCBs. A very lightly IPA-dampened swab can clean specific dirty spots, but let it dry completely — IPA evaporates fast, which is why we use it instead of water.
Indian climate note: If you're cleaning during monsoon season, work in an air-conditioned room if possible. High humidity means IPA takes slightly longer to evaporate, and you don't want moisture lingering on electronic components. Allow extra drying time — 30 minutes minimum before reassembly.
Stabilizer Lubing & Maintenance
Stabilizers are the wire+housing mechanisms under your larger keys (spacebar, shift, enter, backspace). They're the #1 source of keyboard rattle, and cleaning time is the perfect opportunity to fix them.
Remove Old Lube and Grime
Use cotton swabs soaked in IPA to clean the stabilizer housings and wire. Old lube turns brown/black and gets sticky — remove all of it. Clean the wire completely until it's shiny metal.
Apply Fresh Lube to Wire Ends
Apply Krytox 205g0 or dielectric grease to both ends of the stabilizer wire where they contact the housing. A thin, even coat is all you need — too much causes sluggish key return.
Lube the Housing Interior
Apply a thin layer of lube inside each stabilizer housing where the wire slides. This eliminates ticking sound on key press and release. Use a small brush or the end of a cotton swab.
Bandaid/Holee Mod (Optional)
For the smoothest, quietest stabilizers, apply a small piece of fabric bandaid or Holee mod (thin fabric tape inside the stem) to eliminate any remaining rattle. Many Indian mech enthusiasts swear by this mod.
A properly lubed stabilizer transforms your keyboard's sound profile. That hollow, rattly spacebar becomes a deep, satisfying "thock." It's the single biggest improvement you can make during a cleaning session — and it costs almost nothing.
How Often Should You Clean?
Your cleaning schedule depends on your environment and habits. Here's a practical guideline for Indian gamers:
| Cleaning Type | Frequency | Time Needed |
|---|---|---|
| Quick surface wipe | Daily (or every other day) | 1-2 minutes |
| Quick clean (flip, air, brush) | Weekly | 5 minutes |
| Deep clean (keycap removal) | Every 2-3 months | 45-60 minutes + drying |
| Full teardown + re-lube | Every 6-12 months | 2-3 hours + drying |
Increase frequency if:
- You eat snacks or drink beverages (especially chai) near your keyboard
- You have pets — cat/dog hair gets everywhere
- You live in a high-dust area (near roads, construction, or ground-floor rooms)
- Your room doesn't have AC — sweat and humidity accelerate grime buildup
- It's monsoon season — humidity causes oxidation on exposed metal contacts
- You have long hair that tends to shed
Indian summer tip: During peak summer (April-June), sweaty palms leave salt deposits on keycaps that accelerate ABS shine. A quick wipe with a damp cloth after each gaming session prevents this buildup.
Common Mistakes to Avoid
Even with good intentions, some cleaning methods do more harm than good. Here's what NOT to do:
Using a Vacuum Cleaner Directly on the Board
Strong suction can pull switches out of hot-swap sockets or damage surface-mount components on the PCB. Static discharge from vacuums can also fry electronics. Use compressed air to blow debris OUT instead.
Submerging the PCB in Water
We've seen this "hack" on YouTube — putting the entire keyboard in water. While some people get away with it after thorough drying, it's a massive risk. Water causes corrosion on solder joints and can damage the USB connector, LEDs, and controller chip permanently.
Using Acetone or Nail Polish Remover
Acetone dissolves ABS plastic — it will destroy your keycap legends and make the surface cloudy. It also damages some switch housings. Stick to isopropyl alcohol (IPA) only. Even Colin glass cleaner is too harsh for keycaps.
Yanking Keycaps Without a Puller
Using your fingers or a flathead screwdriver risks snapping the switch stem (especially with Cherry MX-style stems) or scratching adjacent keycaps. A wire keycap puller costs Rs 100 on Amazon — don't skip it.
Over-Lubricating Stabilizers
More lube is not better. Excess lube causes keys to feel sluggish, creates a squishy bottom-out, and attracts even more dust. Apply thin, even layers. You can always add more — removing excess is tedious.
Reassembling While Still Damp
Impatience is the enemy. Even small amounts of moisture trapped under keycaps or inside switch housings can cause corrosion over time. In humid Indian conditions, allow extra drying time — at least 6 hours for keycaps, overnight if possible.
Frequently Asked Questions
Can I wash my mechanical keyboard with water?
How often should I clean my mechanical keyboard?
Can I use a hair dryer to dry my keycaps?
What is the best liquid for cleaning keyboard switches?
Will removing keycaps damage my keyboard?
Can I clean my keyboard without removing keycaps?
The Bottom Line
TL;DR
A clean mechanical keyboard isn't just about aesthetics — it directly affects how your switches feel, how your stabilizers sound, and how long your board lasts. In Indian conditions with high dust, humidity, and heat, regular cleaning is non-negotiable if you want your keyboard to perform at its best.
The routine is simple: weekly quick cleans (flip, blast, wipe) take 5 minutes and prevent buildup. A deep clean every 2-3 months with keycap removal, IPA wipe-down, and stabilizer maintenance keeps everything feeling factory-fresh. The whole process costs less than Rs 500 in supplies and an hour of your time.
Your mechanical keyboard was an investment — whether it cost Rs 2,000 or Rs 20,000. Treat it right, and it'll reward you with years of smooth, satisfying keypresses. Neglect it, and you'll be wondering why your "premium switches" feel like typing on sand. The choice is yours.
Related Guides
Best Gaming Keyboards Under Rs 2,000
Budget mechs that punch above their weight
Best Gaming Keyboards Under Rs 5,000
Mid-range picks with hot-swap and RGB
Red vs Blue vs Brown Switches
Which switch type is right for your playstyle?
Mechanical Keyboard Switch Types Explained
The complete guide to switch variants and feel